
Many people start their journey into leathercraft by tooling a traditional Western floral pattern. Not only is this a popular style, but the basic techniques learned by using a small collection of tools to create these simple designs set you up for success in other projects. Think of it as the “wax on, wax off” of leathercraft tooling.
If you want to give tooling a try, start by downloading this free pattern. The tools described below are all available in our Explore Leathercraft kit and the pattern is designed to fit on one of our tooling leathers with plenty extra for practice.
Note: Stamping and tooling is intended for vegetable-tanned leather, not chrome-tanned leather. Not sure what kind you have? Check out our handy leather guide.
Step 1: Dampen the Leather
When using vegetable tanned leather, typically you’ll find that it’s somewhat stiff. Adding moisture can make the leather more malleable to take designs and even be sculpted. Many people who struggle with stamping their first time find it is because they either didn’t add enough water or had too much water in the leather. 
So how do you find the right moisture content? In a process known as “casing the leather”, you’ll want to add water evenly to the smooth (grain) side of the leather with a sponge or spray bottle. You’ll see the leather absorbs the water pretty quickly and you will want to keep applying light coats of water until the absorption slows down.
Once it hits that point, let it set for a few minutes until it begins to lighten slightly in color and then it is perfect for stamping and tooling. For most projects, you don’t want to dampen the back of the leather.
Step 2: Trace Your Pattern
Many people get so excited to start tooling that they rush tracing their pattern. It’s worth noting early and often that learning leathercraft is not about speed, but rather intention. A poorly traced pattern will result in a poorly tooled design because you don’t have the correct guidelines to work from.
First you will want to case (moisten) your leather as instructed above and then you are ready to trace your pattern.

Because it’s important to keep the pattern lined up, many people will use a piece of scotch tape to attach their pattern to their table so that they can lift it, look at the leather to check their progress, and then put the pattern down in the exact same spot. To trace the pattern, you can use a stylus or any blunt object with a fine tip. Too sharp and it will cut the leather. Too blunt and it doesn’t give clean guides. A mechanical pencil with the lead pushed in can work, but avoid using a pen as it may pierce through the paper and permanently mark the leather.
Pro Tip: If you plan on using a pattern multiple times, consider printing it on card stock. Also, when you trace the pattern, you are putting a piece of paper on a damp surface, so lining the back of the pattern with packing tape can be helpful to preserve the pattern. If you do this, note that you are adding an extra layer between your pattern and the leather, so you may need to push a little harder with your stylus or tracing tool to get the desired effect.
Step 3: The Swivel Knife
This tool is unique to leathercraft and may feel awkward in your hand at first. The proper way to hold it is to have the first knuckle of your pointer finger in the curved part (known as a yoke) and then rotate the barrel of the swivel knife between your thumb and middle finger. It will feel strange at first since it’s not a muscle group you usually use that way, but you’ll find that it becomes more comfortable pretty quickly. You might consider practicing on a piece of scrap first to get control of the tool. Even professional leatherworkers will often do a little practice before they carve their piece to make sure their hand is warmed up.

Before you get started: strop your knife. What does that mean and why do you do it? When leather is leather is tanned, typically there are a number of oils and tannins that are used in its production. These can slowly build up on your knife as you are cutting, creating somewhat of a dragging sensation.
Stropping your knife means using some jeweler’s rouge on a piece of card stock and then polishing your blade. It’s always good to do this before you start, but also throughout the carving process.
To use the swivel knife, place the corner tip of the blade into the leather (not the whole blade), cutting roughly ⅓ the thickness of the leather, and drag the knife towards you along the lines you traced. Cutting towards yourself allows you to have more control, so many leatherworkers will move their leather frequently to ensure they’re always pulling the knife towards themselves.

ProTip: Look at your tooling from a 90-degree angle so that your swivel knife can stay perpendicular to the leather. Looking directly on often results in overcompensating by angling your swivel knife to see what it is doing, which makes it hard to control and creates undercutting. Move your body to adapt to the tool rather than the other way around.
ProTip: This is a good time to make sure that you have ample lighting. If you can’t see the tracings you made because it’s too dark or your hand shadows the light source, fix that issue to the best of your ability early. Proper lighting makes the following steps much, much easier.
A Quick Intermission: Stamping Tips Before You Get Started
In addition to proper lighting, you want to make sure that you have a solid surface underneath your leather before stamping, which can help create more emphasis with the impressions.
The purpose of stamping is to help bring a flat design to life. When using leather stamping tools, you will want to hold them with your middle finger and thumb of your off-hand roughly a half-inch from the face of the stamp end of the tool for control. You will use the mallet in your dominant hand to strike the flat tip of the handle to leave an impression on the leather. Generally speaking, there are two different techniques that you are going to use with these stamping tools:
A single impression - This is used for the camouflage tool, the veiner, and the seeder. With these tools, you’ll want to hold the tool steady and make a single impression, even if that means hitting the stamp a few times. How hard you hit the stamp and how moist your leather is will determine the depth and clarity of your stamping impression. Often these are used as an angle to get only a partial impression to fill the appropriate depth of the space.
A texturing impression - This is used for the pear shader, the beveler, and the backgrounding tool to create textures. Holding the handle of the stamp between your middle finger and thumb roughly half of an inch back from the impression, you’re looking to make almost a jackhammering motion with the stamp. You’ll want your grip on the stamp to be firm enough to maintain control, but not so firm that the stamp can’t slide through your fingers a bit as you strike it. The goal of this technique is to create uniform shading rather than a single impression. Typically these stamps are held at a 90-degree angle from the leather and remain somewhat vertical.
ProTip: The first time you use any of these tools they may not do exactly what you’re hoping, particularly when trying to create smooth, seamless textures. As with anything, you get better with practice, but it may not look perfect when you’re getting started. Before stamping any of these individual tools on your cut pattern, you might consider dampening a scrap of leather and practicing on that first to get some control with the tools and see how they work.
Step 4: The Camouflage Tool

This tool is used to create visual movement and flow in tooled floral pieces. The camouflage tool looks a bit like a crescent moon with a lined texture and is typically used in these types of designs at an angle.
The steepness of the angle is dictated by the width of the area you are stamping because you'll want to use a partial impression of the face of the tool without going past your cut line. Typically with the camouflage tool, you are looking to create a sequence of single, clean impressions to bring texture and flow to curves.
Step 5: The Pear Shader

The pear shader is typically used to create depth and shadows in more open areas of a design, such as within the petals of a flower. The goal here is to make many light strikes with the tool that create texture while attempting to blend the pattern so you don’t see any individual strikes. You may find it helpful to lightly rotate the tool as you hit it to prevent an obvious pattern in your stamping with this tool.
ProTip: If you are getting really deep impressions with your pear shader, you may be hitting it too hard, or your leather might be too wet. Stamping tools have trouble gliding across the surface of leather that is too wet and get stuck, like trying to fight through a bog. If your design looks like you hit it repeatedly with a ball-peen hammer, you may just need more practice, but it also could be that you should let the leather dry a bit.
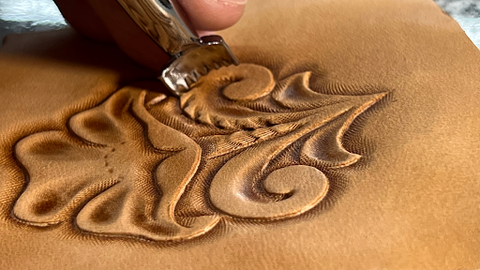
Step 6: The Beveling Tool
Many leather workers have a love/hate relationship with the beveler. When stamping designs, you will likely bevel every line that you cut with the swivel knife… which is often quite a few lines! The beveler is responsible for adding much of the depth and shading to the design, turning it into a three-dimensional piece of art.

Before you use the beveler, look at your design and think “what is it that I would want to be in the foreground of this design?”. You may have to look at a few finished samples online for this to make sense, but the shading is intended to bring the more dominant elements of the design to the forefront creating depth. Think of it as a shadow.
When using the tool, you’ll want to bevel roughly the same depth that you cut, using the same “jackhammering” technique mentioned above. Aimi to create small, overlapping impressions, moving the tool roughly ⅓ of the distance of the face each time, so that you get a good consistent, clean line.
ProTip: This step can be a little time-consuming, and you may have the urge to speed through it as you get bored or your hand starts to cramp a bit. As mentioned above, leathercraft is not about speed, but about intention. Take your time, take a break if you need to, because rushing here will be obvious in the final result. If you do take a break longer than a few minutes, you may need to reapply another very light coat of water to make sure it returns to the right moisture level.
Step 7: The Seeder Stamp

The seeder stamp is used to add pollen pods to the center of a flower. A word of caution: since this tool has a little bit of a sharper impression, hitting it too hard may actually cut through your leather. For this tool, you’ll want to create a collection of small, singular impressions that are close enough together that the edges overlap.
ProTip: Where you put these impressions is very important because it’s easy to accidentally overlap a seed, and then you have a weird half-seed and there’s no way to undo it. Be very methodical about where you put each of these impressions.
Step 8: The Veiner Tool
As the name might imply, the primary purpose of this tool is to add veins to leaves. Similar to the camouflage tool, the angle and position in which you make these impressions will be determined by the design itself. Also similar to the camouflage tool, these impressions are intended to create flow and visual movement to your design. Again, you’ll want to use enough of the tool’s face to get a good impression, but make sure you aren’t stamping over the line.
ProTip: Since this is one of the last steps, there’s nothing else that might cover up a mistake here. Sometimes it’s better to play safe than sorry with the angle of the veiner, starting with a very steep angle and then angling it up slightly if you see that you need more of the impression.
Step 9: The Background Tool
This tool is typically used to fill in the gaps and openings behind your flower, leaves, and stems to push down the leather with a slight texture so that the rest of the design really stands out against the background.
This is another one of those “jackhammering” tools, although you may want to rotate the tool slightly between your thumb and middle finger when moving across larger areas to help avoid the appearance of a pattern. Since it’s the final step of your carving, you might want to practice on scrap with this one a little first before jumping in so you don’t accidentally mess up your hard work in the final phase.
ProTip: This tool is designed to both cover larger areas and fit into corners, however the versatility of the tool can leave a bit of a “sharper” marking. If you are finding that the tool is leaving too dramatic of an impression with a single strike, consider lightening your hit, but also try letting the leather dry a little bit more. If the leather is less damp it won’t take the impressions quite as strongly, which can be helpful at this step.
Step 10: Decorative Cuts

For most leather carving projects, decorative cuts are a way that artists will add their own style to the design. These are meant to add additional flow and typically help fill in areas that don’t have as many details. They are cut with the swivel knife (similar to step 3) and you can either follow the ones presented in a design or develop your own designs with these cuts.
Step 11: Finishing Your Project
Now that the tooling is done, you have a lot of different options on how to finish it. You may want to leave it just the way it is. You could also dye it. Or antique it. Or paint it. Or airbrush it. When you’re done, you can use it as a patch or put it in a frame. It’s up to you what you want to do with it from here.
Final Pro Tip: Put your name and the date on the back with a sharpie marker. Your next projects may have nothing to do with Western floral, but rather geometric stamping or figure carving or something else entirely. However, many leathercrafters will go back and tool this pattern again every so often, using it as a consistent comparison of how far their tooling has come. Regardless of how perfect or imperfect your first attempt was, hold onto it; it’s a good reminder of how far you’ve come.